
0. 로그라이크란?
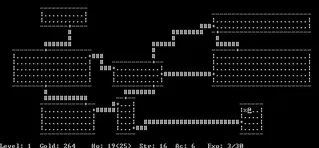
로그라이크는 말 그대로 로그 처럼 생긴 게임을 의미한다.
로그 게임은 1980년대 제작된 텍스트 기반으로 된 RPG 던전 탐험 게임이다. 현대에 들어서는 이 로그라이크 게임의 특징 중, 게임오버 시 처음부터 다시시작, 모든 아이템 초기화, 맵 초기화 등이 있다.
이 중, 맵이 초기화 되는 기능을 구현하고자 한다.
맵을 생성할때, 맵의 크기는 전부 동일하다고 가정한다. 또한 통로는 생성하지 않고, 맵을 모두 연결시킨다.
1. 고려할 점.
일단 로그라이크 맵을 만들기 위해 n*m 크기의 배열을 먼저 생성할것이다.
이후, 배열위에서 아무 무작위 점을 하나 정하고, 커서를 그 위치로 옮긴다. 커서가 움직이는 방향은 상하좌우이고, 커서가 움직일때마다 움직인 방향에 맵을 생성할것이다.
맵의 프리팹은 간단하게 다음과 같이 구성했다.
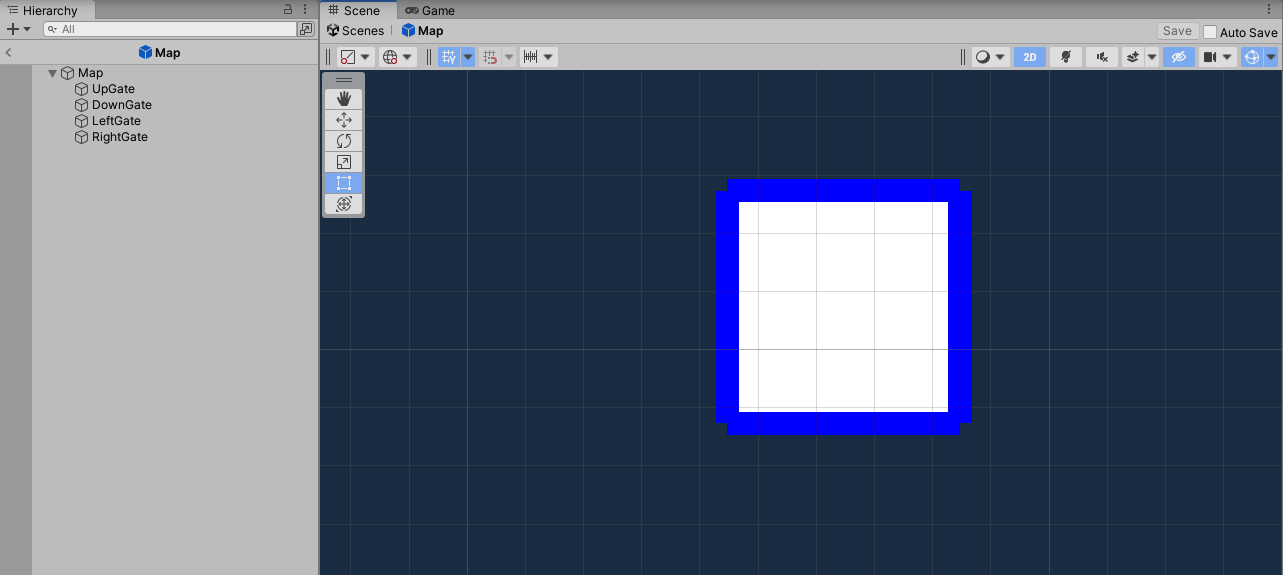
1*1 크기의 스프라이트 하나를 생성하고, 스프라이트 아래에 벽으로 만들어진 파란색 오브젝트를 상하좌우에 붙여뒀다. 각각 오브젝트는 Up, Down, Left, Right게이트이다.
그리고 맵 프리펩에는 다음과 같은 코드를 컴포넌트로 추가하였다.
using System.Collections;
using System.Collections.Generic;
using UnityEngine;
public class Map : MonoBehaviour
{
    public GameObject[] gateList; //0. Up, 1. Down, 2. Left, 3. Right;
    public int mapNum = 0;
    public GameObject[] mapList = new GameObject[4]; //0. Up, 1. Down, 2. Left, 3. Right;
}
컴포넌트 추가 후, gateList 배열에는 위에서 만들어 둔, 오브젝트를 상하좌우 순서대로 추가하였다. 추후에 게이트에 접근하려면 상하좌우 순서대로 인덱스 번호는 0123이 된다.
커서가 있는 방은 Instantiate함수로 맵 프리펩을 생성하고, 예를 들어, 커서가 현재 방에서 위로 움직이면서 방을 생성했다면, 현재방에서 위의 벽을 없애고, 새로 생성될 방의 아래 벽을 없애 서로 연결되어있다는 점을 강조할것이다.
이런 방법으로 생성하다보면 다음과 같은 문제점이 발생한다.
"만약 맵을 생성하다가, 생성할수 없는 지점만 생성하는 경우, 즉, 현재 커서가 위치한 타일의 상하좌우에 맵이 생성되어 있거나 배열의 밖인 경우, 맵을 더이상 생성하지 못한다."
표로 나타내면 다음과 같은 상황이다.
| -1 | -1 | -1 |
| -1 | 0 | 1 |
| -1 | 1 | 1 |
0은 현재 커서가 위치해있는 칸이고, 1은 이미 다녀온 칸, -1은 배열의 밖이다.
이러한 경우 0의 위치에서 상하좌우 어느곳으로도 움직일 수 없는 상황이 된다.
따라서 이와 같은 상황에서 다음과 같은 해결책을 냈다.
"움직일 수 없다면 커서만 이미 다녀온 방 아무곳으로 이동시킨 후, 방은 생성하지 않고, 이동한 위치의 벽을 없앤다. 즉, 이동가능하게 연결시킨다."
이정도로 아이디어를 생각해두고 코드에 옮겨 적었다.
2. 구현
using System.Collections;
using System.Collections.Generic;
using UnityEngine;
using UnityEngine.UI;
public class CreateManager : MonoBehaviour
{
[SerializeField] GameObject mapPrefab;
[SerializeField] GameObject textPrefab;
[SerializeField] GameObject mapGroup;
[SerializeField] GameObject textGroup;
[SerializeField] List<GameObject> mapList = new List<GameObject>();
[SerializeField] InputField xInput, yInput, mapCountInput;
// [SerializeField] List<Vector2> mapPos = new List<Vector2>();
int[] dirX = {0, 0, -1, 1}; //0 0 좌 우
int[] dirY = {1, -1, 0, 0}; //상 하 0 0
int[,] mapArr;
int loopcount; //무한반복 막기위한 변수
public void CreateMapBtn(){
DestroyAllSubObjects(mapGroup.transform);
DestroyAllSubObjects(textGroup.transform);
mapList.Clear();
int x = int.Parse(xInput.text);
int y = int.Parse(yInput.text);
loopcount = 10000;
if(x * y >= int.Parse(mapCountInput.text)){
CreateMapArr(x,y);
}
else{
print("Error!");
}
}
void CreateMapArr(int x, int y){//배열로 작업
mapArr = new int[x,y]; //x,y크기의 배열 생성
for(int i=0 ;i<x;i++){ //모든 방 0으로 초기화
for(int j =0;j<y;j++){
mapArr[i,j] = 0;
}
}
Vector2Int sPos = new Vector2Int(Random.Range(0,x), Random.Range(0,y)); //무작위 시작위치 설정
Vector2Int dirPos;
int count = int.Parse(mapCountInput.text);
GameObject map = Instantiate(mapPrefab, new Vector3(sPos.x, sPos.y, 0), Quaternion.identity, mapGroup.transform);
GameObject txt = Instantiate(textPrefab, map.transform.position, Quaternion.identity, textGroup.transform);
txt.GetComponent<Text>().text = count.ToString();
map.GetComponent<Map>().mapNum = count;
mapList.Add(map);
map.name = "map" + sPos.x + " " + sPos.y;
mapArr[sPos.x, sPos.y] = count; count -= 1; //시작지점 count로 초기화 후 count 감소
while(count > 0 && loopcount > 0){
print(count + " " + loopcount);
print("현재좌표 :" + sPos);
int r = Random.Range(0,4); //이동방향 랜덤설정
for(int i=0;i<4;i++){
int nr = (r + i) % 4;
Vector2Int nPos = new Vector2Int(sPos.x + dirX[nr], sPos.y + dirY[nr]); //랜덤한 방향을 받아옴
print("이동할 좌표 :" + nPos);
if(nPos.x >= 0 && nPos.x < x && nPos.y >= 0 && nPos.y < y){ //새로운 좌표가 이동할 수 있는 범위 내의 값이여야 이동가능
if(mapArr[nPos.x, nPos.y] == 0){ //이동하지 않았던 방
dirPos = nPos - sPos;
sPos = new Vector2Int(nPos.x, nPos.y); //현재 위치를 새로운 위치로 바꿔줌.
mapArr[nPos.x, nPos.y] = count; //count로 만들어준다.
//방 생성
GameObject nmap = Instantiate(mapPrefab, new Vector3(sPos.x, sPos.y, 0), Quaternion.identity,mapGroup.transform);
txt = Instantiate(textPrefab, nmap.transform.position, Quaternion.identity, textGroup.transform);
txt.GetComponent<Text>().text = count.ToString();
nmap.GetComponent<Map>().mapNum = count;
mapList.Add(nmap);
nmap.name = "map" + sPos.x + " " + sPos.y;
if(dirPos.x != 0){ //게이트 생성
if(dirPos.x == 1){ //오른쪽으로 방 생성
map.GetComponent<Map>().gateList[3].SetActive(false);
map.GetComponent<Map>().mapList[3] = nmap;
nmap.GetComponent<Map>().gateList[2].SetActive(false);
nmap.GetComponent<Map>().mapList[2] = map;
}
if(dirPos.x == -1){ //왼쪽으로 방 생성
map.GetComponent<Map>().gateList[2].SetActive(false);
map.GetComponent<Map>().mapList[2] = nmap;
nmap.GetComponent<Map>().gateList[3].SetActive(false);
nmap.GetComponent<Map>().mapList[3] = map;
}
}
if(dirPos.y != 0){
if(dirPos.y == 1){ //위로 방 생성
map.GetComponent<Map>().gateList[0].SetActive(false);
map.GetComponent<Map>().mapList[0] = nmap;
nmap.GetComponent<Map>().gateList[1].SetActive(false);
nmap.GetComponent<Map>().mapList[1] = map;
}
if(dirPos.y == -1){ //아래로 방 생성
map.GetComponent<Map>().gateList[1].SetActive(false);
map.GetComponent<Map>().mapList[1] = nmap;
nmap.GetComponent<Map>().gateList[0].SetActive(false);
nmap.GetComponent<Map>().mapList[0] = map;
}
}
map = nmap; //시작방을 새로 만든 방으로 바꿈.
count -= 1;
print("방생성 완료 : " + nPos + " : " + mapArr[nPos.x, nPos.y]);
}
else{//0이 아니라면 이미 이동했던 방임.
print("이미 다녀온 방" + mapArr[nPos.x, nPos.y]);
//커서와 함께 현재 방과 커서가 이동할 방을 이어줘야함.
GameObject nmap = FindMapAtPos(nPos.x, nPos.y); //이미 다녀온 방을 찾아 저장
print(nmap.transform.position.x + ", " + nmap.transform.position.y + " and num is " + nmap.GetComponent<Map>().mapNum);
// map = FindMapAtPos(mapArr[sPos.x, sPos.y]);
dirPos = nPos - sPos;
if(dirPos.x != 0){ //게이트 생성
if(dirPos.x == 1){ //오른쪽으로 방 생성
map.GetComponent<Map>().gateList[3].SetActive(false);
map.GetComponent<Map>().mapList[3] = nmap;
nmap.GetComponent<Map>().gateList[2].SetActive(false);
nmap.GetComponent<Map>().mapList[2] = map;
}
if(dirPos.x == -1){ //왼쪽으로 방 생성
map.GetComponent<Map>().gateList[2].SetActive(false);
map.GetComponent<Map>().mapList[2] = nmap;
nmap.GetComponent<Map>().gateList[3].SetActive(false);
nmap.GetComponent<Map>().mapList[3] = map;
}
}
if(dirPos.y != 0){
if(dirPos.y == 1){ //위로 방 생성
map.GetComponent<Map>().gateList[0].SetActive(false);
map.GetComponent<Map>().mapList[0] = nmap;
nmap.GetComponent<Map>().gateList[1].SetActive(false);
nmap.GetComponent<Map>().mapList[1] = map;
}
if(dirPos.y == -1){ //아래로 방 생성
map.GetComponent<Map>().gateList[1].SetActive(false);
map.GetComponent<Map>().mapList[1] = nmap;
nmap.GetComponent<Map>().gateList[0].SetActive(false);
nmap.GetComponent<Map>().mapList[0] = map;
}
}
sPos = new Vector2Int(nPos.x, nPos.y); //위치 이동. 왜냐면 코너에서 더이상 생성못하는 경우도 있기 때문.
map = nmap; //현재 맵을 이미 다녀온 방으로 이동.
print("이동할 수 없어서 map은 다음방으로 변경됨. 방의 좌표:" + map.transform.position.x + "," + map.transform.position.y + " , " + map.GetComponent<Map>().mapNum);
}
break;
}
else{
print("이동할 수 없는 위치");
continue;
}
}
loopcount -= 1;
}
}
void DestroyAllSubObjects(Transform parent)
{
foreach (Transform child in parent)
{
Destroy(child.gameObject);
}
}
GameObject FindMapAtPos(int x, int y){ //좌표로 맵을 찾는 함수
for(int i = 0;i <mapList.Count;i++){
if(mapList[i].transform.position.x == x && mapList[i].transform.position.y == y){
print("return " + mapList[i] + mapList[i].transform.position.x + "," + mapList[i].transform.position.y);
return mapList[i];
}
}
print("return null...");
return null;
}
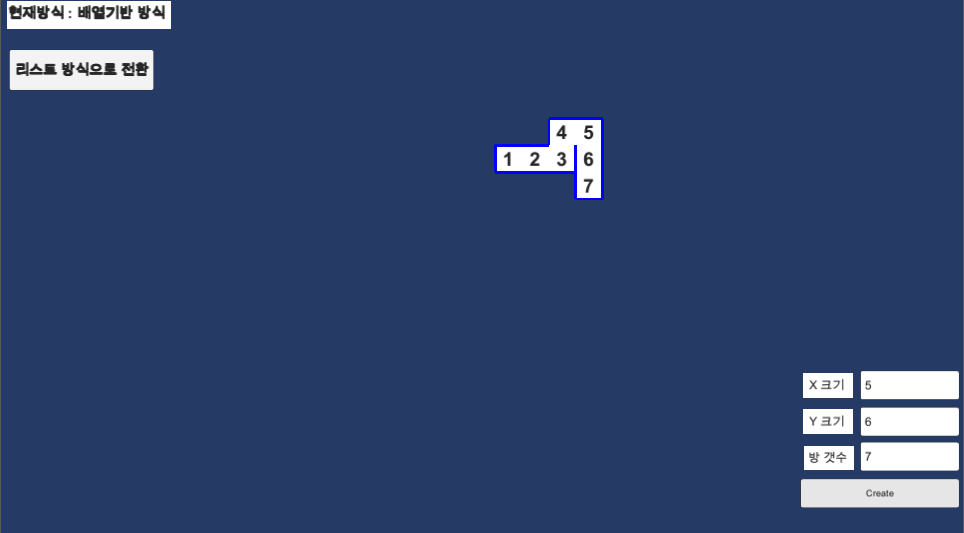
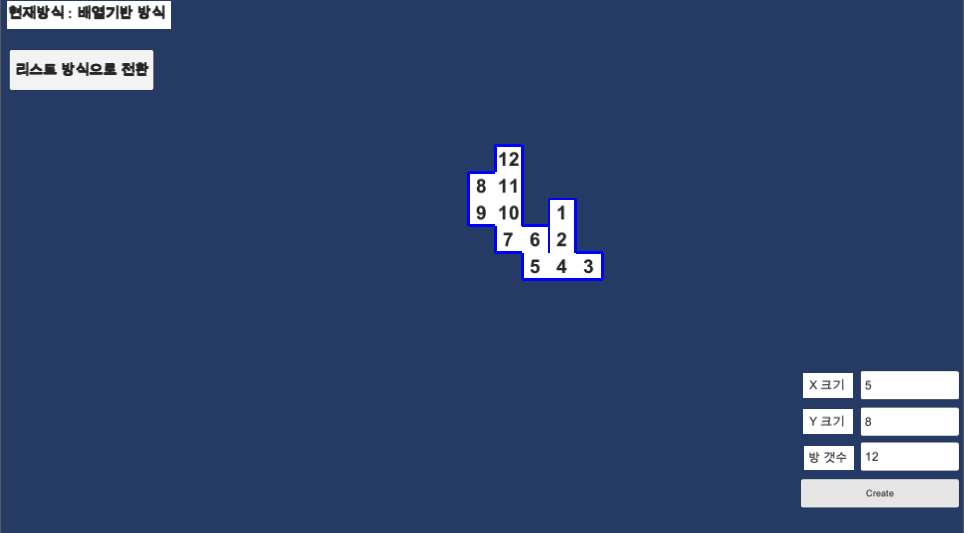
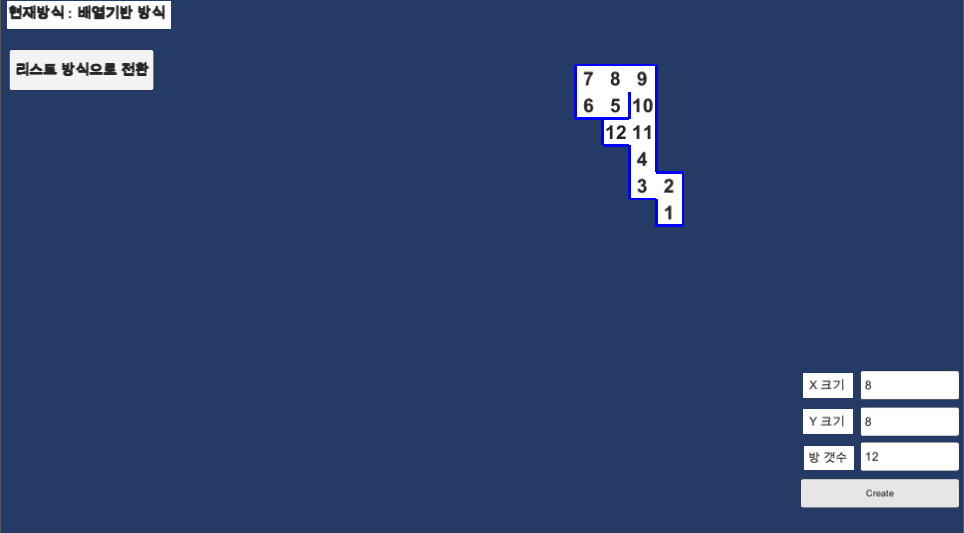
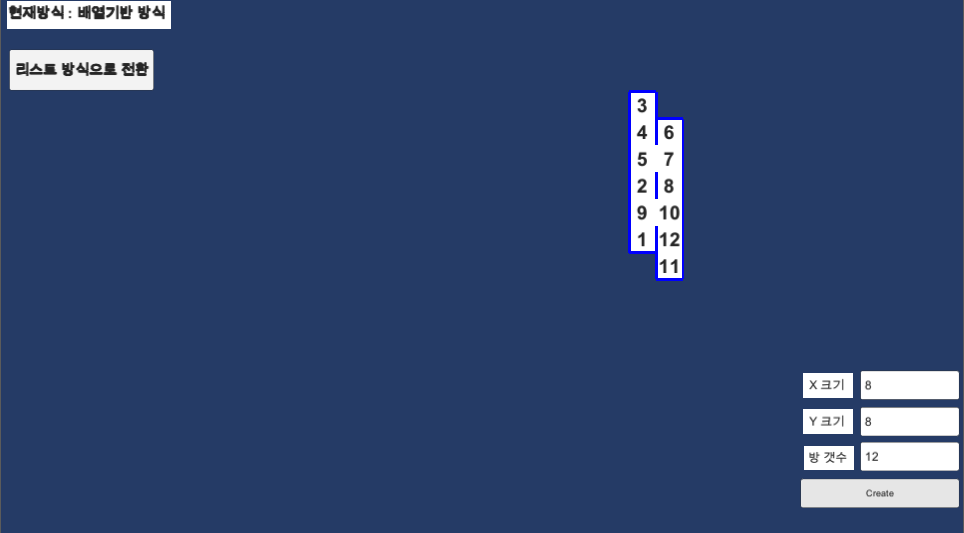
}코드에 대한 설명을 간략히 하자면, 위에서 언급한 시작점부터, 만들어가는 방 순서대로 번호를 매겨 타일에 부착하는데, 번호의 순서는 count부터이다. 즉 12개의 방을 만들기로 했다면 처음 만든 방의 번호는 12이고, 순서대로 11, 10, 9, .... 2, 1 로 간다. 따라서 첨부된 이미지에서 방을 따라갈땐 제일 큰수부터 내림차순으로 이동하면 된다. 만약 4 다음 3으로 가야하는데 주변에 3이 없다면 이는 이동할 수 있는 칸을 찾기 위해 커서만 이동한것이고, 4에서 3까지 가는 길 중간에 만난 방은 모두 연결되어 있을것이다.
코드는 너무 긴거 같아서 접어두었다.
따라서 위의 코드를 실행하면 다음과 같은 맵들이 생성된다.
이 맵은 6번방에서 3번방으로 가는 길은 탐색 안한것이다. 따라서 막혀있다!
이 맵은 6번 방에서 2번방으로 가는 길은 탐색 안한것이다!
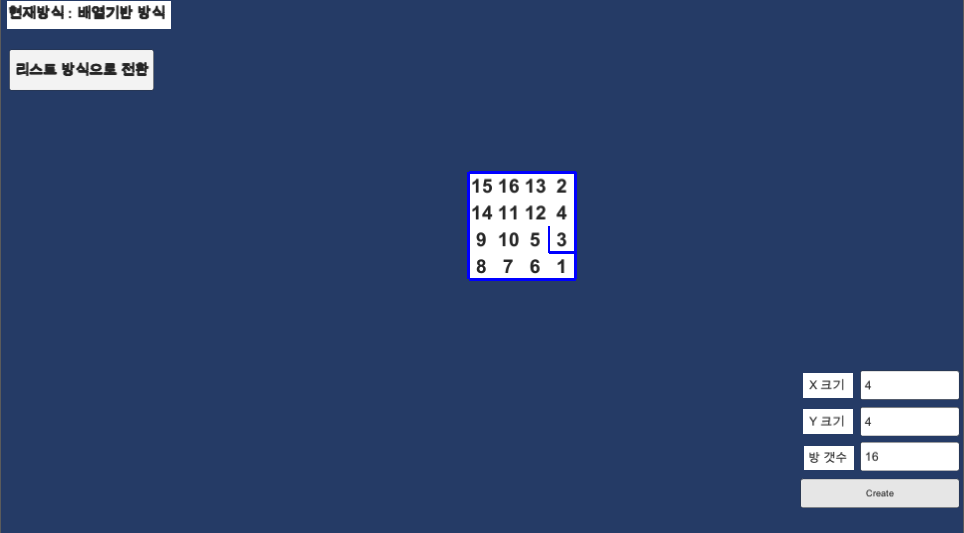
맵의 크기가 n*m일때, n*m개의 맵을 생성하면 거의 모든 방이 연결된다. 이는 탐색하는 과정에 커서가 움직인 방향의 방의 문을 모두 열어두고 생성을 진행하기 때문이다.
따라서 이 코드는 맵의 크기를 넉넉하게 주고, 맵을 조금만 생성하면 (예를 들면, 8*8 사이즈에 12개씩 생성, 이는 최대값인 64개보다 적은 방이다!) 뭔가 예쁜 방을 만들 수 있다.
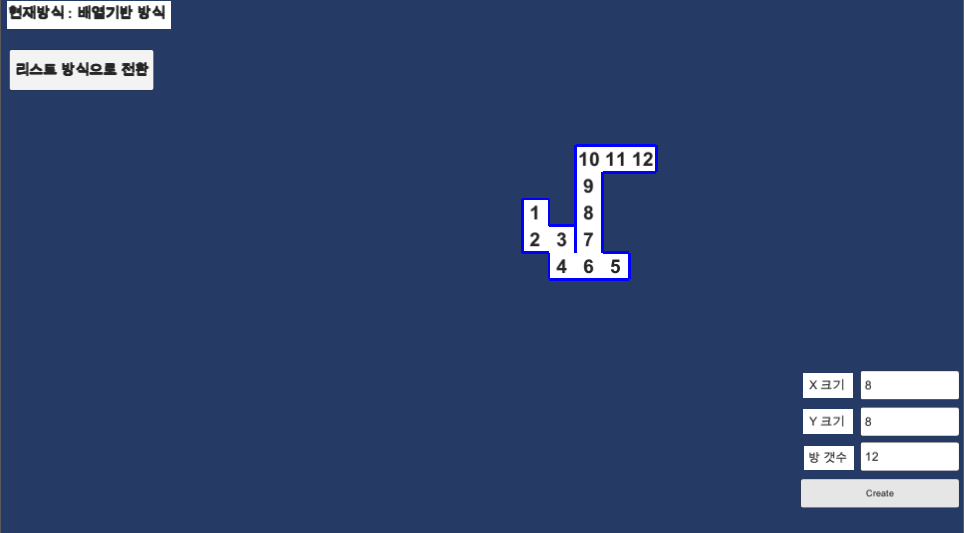
뭔가 그럴싸한 던전이 생성되었다. 지금은 맵의 크기가 1*1이지만, 이 맵의 크기를 키워서 맵을 연결시키고, 맵 내부의 무작위 요소(장애물, 아이템, 몬스터 등등) 을 추가한다면 보다 좋은 게임이 될것이다. 추가로 미니맵도 오른쪽 상단에 추가시키면 더 재밋는 게임이 될 것 같다.
'Develop > Unity' 카테고리의 다른 글
| [Unity] 멀티 플레이를 위해 포톤을 연동하자!(Photon) - 1. 서버 연결 (0) | 2023.12.11 |
|---|---|
| [Unity] 멀티 플레이를 위해 포톤을 연동하자!(Photon) - 0. 기본설정과 가입방법 (0) | 2023.12.09 |
| [Unity] 오브젝트 풀링 (0) | 2023.11.22 |
| [Unity] 유니티 멀티플레이를 위한 통신 구현 (Unity Mirror) (2) | 2023.11.21 |
| [Unity] 씬 로딩 시 start함수의 동작 (0) | 2022.01.12 |